How to make an Instagram filter: Instagram filters are a great way to engage with your audience in an interactive way and grow your following organically. Since August 2019, Spark AR allows anyone with an Instagram and Facebook account to create and publish AR effects for these platforms.
How to Make an Instagram Filter
Learn how to get started making an Instagram Filter in this post.
1. Get a Facebook account
Wow, this step is really easy—although, not without controversy.
You need a Facebook account if you want to make and publish Instagram filters. The software for making AR filters is called Spark AR Studio and the way to publish is through Spark AR Hub. In order to use both these, you’ll need a Facebook account. In order to be an AR Manager and publish effects on behalf of other businesses and individuals, you need a Facebook account. You can’t get around it.
If you want to create AR effects using a Facebook-less alternative, you could try Snapchat’s Lens Studio. There are also SDK’s for developing AR mobile apps for Unity. The best part about the Facebook and Instagram apps is the volume of engagement. There is nothing particularly special about them, it’s just where a lot of people are at the moment. This social benefit is at odds with the ethical management of the platform, which for the purposes of this post we will bifurcate.
2. Download Spark AR Studio
Just hit the download button! Now, we’re cooking with gas.
This program is a lot of fun to use and there are lots of learning resources on the internet to create any effect you desire. You may notice your computer fan humming into overdrive when the program does it’s computations…do not be alarmed. I run Spark AR on my desktop and rarely, if ever crash a project. I’ve heard of laptops running hot, but it’s totally OK.
There are a lot of versions of Spark AR. Every few weeks you’ll get a notification in the program saying there is a new version with some new features. This is really cool. I think the software is still officially in “beta”, which means they are testing a lot of things and updating frequently. I’d recommend updating when it prompts you to. Older effects have forward compatibility and updating to the latest version will keep your projects up to the latest standards, which change frequently.
3. Create an effect in Spark AR
Do not be scared by the interface! Getting acquainted with the panels and their purpose will make learning how to make an Instagram filter easier. There are also lots of templates on the startup screen to get started. Most of the templates follow similar patterns; they create the base effect you need, then you follow the directives within the project to “drag” or “replace” objects and assets with your own.
Scene Panel
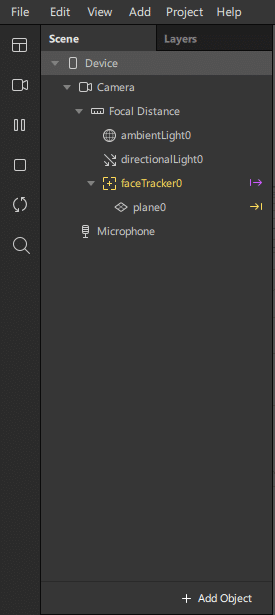
This panel is the left most section. Everything listed here is a part of your effect. Some of the objects are absolutely essential to run an effect; like the Device and Camera.

Hierarchy in the Scene Panel goes like this: most things are placed under the Camera object, because we want to see them.
Try selecting “+ Add Object” from the scene panel and add a FaceTracker. Now we have an object giving us real time data about the face it sees (creepy?) Let’s see what data it gives us!
If you have a webcam on your computer, select the little camera icon on the leftmost edge of your window and select the camera available.

Patch Editor
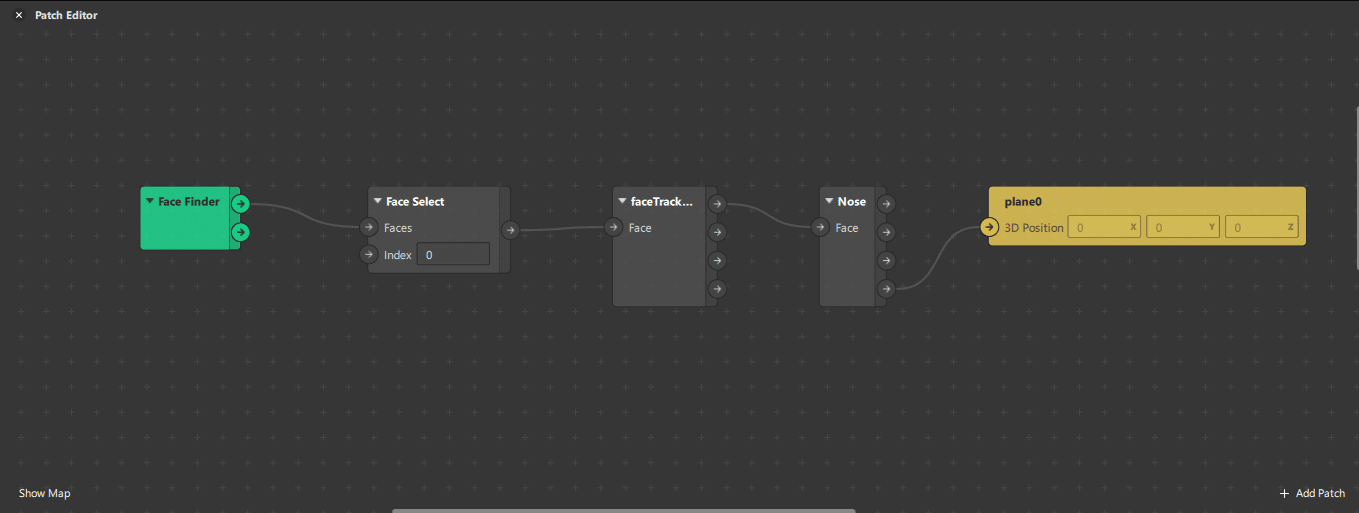
Select View from the toolbar on the top and then “Show/Hide Patch Editor”.

Now look at the Scene Panel and drag-in the “faceTracker0” you just created. With the purple patch in the editor, try dragging out of the little circle nodes to see some options. You can get data from the face detected from this object.
The Patch Editor is a visual programming interface. It is an alternative and complementary method to writing lines of code. We can do most of our effect programming here using Patches.
Select + Add Patch to see all the Patches we have access to. Putting these in combination with one another is the essence of programming an effect. I’m sure there are nose-pickers out there who will quip, “This is not programming.” My quip is that structuring events of any kind is programming and the level of abstraction and complexity is irrelevant to the definition.
There are a few software’s out there that use this kind of programming interface, if you enjoy it: Pure Data (free and open source) and Cycling ’74 (commonly called Max MSP). Each have their strengths and operate within the same signal based paradigm. Pure Data is great at processing multi media and audio. Max MSP can handle the any requirement of your imagination in the context of interactive, real time media processing—think interactive art installation.
Assets Panel
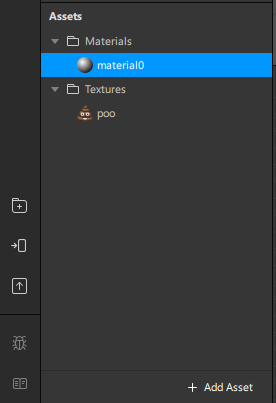
This is where you keep track of the Textures (Images), Materials, 3D Objects, Scripts—everything that your effect needs to run.

Let’s add something to the scene that follows our face. How about a pile of poo? You can drag textures into the assets panel, or import them using + Add Asset button.
Go to the Scene Panel and select + Add Object > then Plane. You’ll see a checkered square in the center of the Simulator. The Simulator is where you can preview your effect.
Properties Panel
With your pile of poo imported, you can select it in the Assets Panel to view it’s properties in the right panel, the Properties Panel. All the information about this asset is shown here.

We want to make sure under the “Manual Compression” section that “No Compression” is selected. This will make our poo’s edges clean and crisp, rather than pixel and fuzzy.
Now select the Plane we added in the Scene Panel. In the properties panel, under Materials, click the + to create a material for the plane.
While we are here, we can use a shortcut to track the plane to our face. At the top of the Properties Panel, there is a button called “Actions” with a magic wand icon. Select it then > Position on Face > Nose. This generates the patch we need to use our faceTracker0 to track the position of the plane to our nose.
Now apply the texture to the material by selecting the Material in the Assets panel. Next to Texture select the drop-down menu and select your Poo texture.
Done! Almost done learning how to make an Instagram Filter.
4. Publish to Spark AR Hub
When you are happy with your effect—or perhaps before even starting—read the policies around publishing effects: Spark AR Review Policies. These are the guidelines under which your effect will be reviewed. If it meets the requirements, your effect will be published. If it does not, it will be rejected with a coded rejection note describing the policy violation.
To publish directly from Spark AR, select File > Export and Upload. Then select Upload. This will open Spark AR Hub in your web browser. From here, you enter the effect details; like it’s name, icon and description. After you submit, the effect will be approved and live in a few days if it passes review.
That’s it! Good times! We learned how to Make an Instagram Filter.
If you’d like assistance with your effect, or need a custom filter built: feel free to send me a message. I’m happy to help anyone learn how to make an Instagram filter or create a custom one.